Margaret Simon, my colleague and twitter/face-to-face friend has invited teacher bloggers to participate in a weekly meme, DigiLit Sunday. Yesterday's topic was technique which is timely since I have been asked by a poet friend, Heidi Mordhorst, to share the tools I use to create my digital compositions. Let me start with a backstory on why I enjoy creating digital compositions with through a poetic lens.

I have always been interested in design and writing since I was a child. In high school, I designed a fashion wardrobe layout for Mademoiselle magazine and received an honorable mention award. I loved writing poetry so I composed poems for the literary magazine. In college, I minored in art and took photography, thinking I would enjoy being an art therapist. When I entered the teaching profession technology was not the rage so design existed with art projects. As soon as Apple products became popular, I started playing with the tools and learned alongside a tech guru teacher friend who moved to Las Vegas upon retirement.
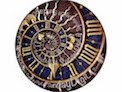
The above digital inspiration, the term created by Margaret, was designed as a teaser for my upcoming gallery, Winter Wanderings. I started the process by finding a free photo from Pixabay instead of one from my collection. If you do not have one in your own portfolio there are other free photos sites to go to beside Pixabay, such as morgueFile and Photos for Class. Over the years, I have enjoyed creating my own collection of photos. Now, I am always on the lookout for unique photo opportunities.
Once I determined the photo to use, I brought it into PicMonkey, my go-to tool for photo editing. I have also used Canva for photo editing. Some of my colleagues use this one for their digital flyers and posters.
 This post marks the 7th post of my Clearing A Path series for the Two Writing Teachers' March SOLSC. I have tried to clear a path for an easy transition from paper creations to digital photo poems. Now please visit Slice of Life here to read what other slicers are writing.
 Also, please visit DigiLit Sunday here to read what other teacher bloggers are saying about technique.
The above digital inspiration, the term created by Margaret, was designed as a teaser for my upcoming gallery, Winter Wanderings. I started the process by finding a free photo from Pixabay instead of one from my collection. If you do not have one in your own portfolio there are other free photos sites to go to beside Pixabay, such as morgueFile and Photos for Class. Over the years, I have enjoyed creating my own collection of photos. Now, I am always on the lookout for unique photo opportunities.
Once I determined the photo to use, I brought it into PicMonkey, my go-to tool for photo editing. I have also used Canva for photo editing. Some of my colleagues use this one for their digital flyers and posters.
The steps I used to create the above digital composition via PicMonkey are:
- Open the Edit icon to find the photo that is housed in your documents. I like to store my photos in iPhoto or iCloud.
- In Basic Edit, use the crop tool to choose the right format for the photo. Then, resize the photo using that tool to achieve the right dimension for a gallery photo. I have been told that 450 pixels is a good size. I usually do not create anything larger than a 4x6.
- While still in Basic Edit, use the exposure and sharpen tabs to create the desired image.
- Use the Border icon to create the type of border that you desire. In the above image, I used Drop Shadow. When I opened that tab, I played around with the intensity and angle of the shadow.
- Use the Text icon to find the text, size, and color of the font for the poem, quote, or poetic thought. (It is best to create your thought in Word or in your notebook before starting the digital process.)
- Use the © symbol sign and date the digital creation. You may want to note the location of the photo also.
- Save the digital composition to your computer and share it via social media in a blog, a tweet, or print it for a project.
Once you have played with the digital tools available for photo editing, you will be able to advance to the next level of layering effects, mashing apps together to create one image, and creating collages.
In the end it is all in the technique and execution of layering effects to create a artistic piece. The addition of a poetic thought allows the writing process to blend with the artistic endeavor and the technological skill to send voice into the digital universe.
Have fun and when ready introduce the process of creating digital inspirations, posters, flyers, and projects to your learners so their voices can fly as well as yours. I hope this post helps those interested in creating digital compositions that blend art and technology with literacy. I am aware that although this process is fun it is time consuming so start slowly and be pleased with your first creations as a starting point on the design journey. Fellow slicer, Julie Johnson, in her Sunday post reminded me of Troy Hicks' statement in Crafting Digital Writing, "digital composers have to think not only as writers, but also as artists and designers."
This post marks the 7th post of my Clearing A Path series for the Two Writing Teachers' March SOLSC. I have tried to clear a path for an easy transition from paper creations to digital photo poems. Now please visit Slice of Life here to read what other slicers are writing.Also, please visit DigiLit Sunday here to read what other teacher bloggers are saying about technique.
Thanks, Carol. Am bookmarking this post and will give it a try!
ReplyDelete